December 11, 2013

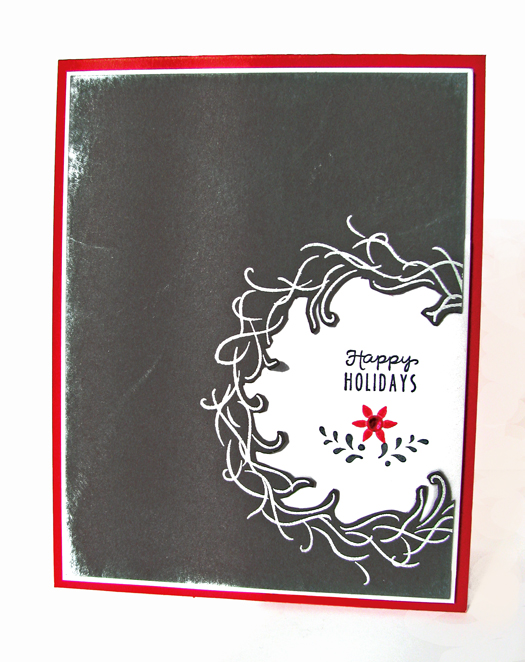
Winter Wreath


Brrrrr. Although I love living in an area of the country that has four distinct seasons, in reality, we have winter for 6 months here. And it can be a loooooooooong six months. *sigh*
However the trade off is beauty. It's spectacular really.


My very simple card today was created while perusing Pinterest. I was looking for crafty ideas to make with all the twigs and branches I collected from my property during our Fall clean-up. And then I saw this:


So when this week's Product Spotlight was the Winter Wreath, I knew just what I wanted to do!

Supplies used: 

I stamped and embossed the Winter Wreath twice in white just off the edge of my card panel. Then I carefully cut out the center and stamped my elements and sentiment "inside" on the BG panel. All that was left was to add a rhinestone and adhere the entire thing to a card base. Easy peasy.

I hope you'll take advantage of the sale price on this must have stamp. It's so incredibly versatile!
I used it for a Thanksgiving card as well about a month ago (never posted).


Thanks for stopping by, check out what the rest of the DT did here.

XOXO,

December 08, 2013

Razzle Dazzle Blog Hop


Hello there:)
I'm posting two cards today that I created for the Razzle Dazzle Blog Hop with Denami!
If you are interested in following along and potentially winning one of TWO $20 gift certificates to the store, then start at the beginning (here), and leave a comment at each stop along the way:)


Since I'm the second stop, right after the amazingly talented, and incredibly sweet Paulina, you probably aren't lost yet *grin*. But I know she opened the hop with jaw-dropping perfection. That girl can CREATE!
As you can see, I created two cards, basically the same LO, only using different colors and supplies for the "razzle dazzle" part. Both used white embossed pine trees and brown embossed winter trees. 

I love the tree stamps from Denami. Love. So I thought adding some glittery snow and/or sparkle decorations would make these trees shine!

Supplies used:
Quickie Glue Pen (LIFESAVER FOR ADDING GLITTER!)
and


 Can you see how those gorgeous sequins pick up the colors and lights around them? Amazing, if I do say so myself. And the magenta glitter garland and "snow" just make me so happy:) Who doesn't like a little glitz now and then? :) White christmas trees are happy, even if cutting them out takes a while.


Here you can see just how good that flock looks. Especially when combined with touches of that extra fine silvery/white glitter! And the gold glitter made that Star Burst stamp come to life!

I hope you were inspired by visiting me today. Although living in the snow belt of NY state can leave much to be desired, seeing all that beautiful, glittery snow on the evergreen trees, and weighing down the branches of the leafless winter trees makes me thankful for all the seasons I get to experience here.

The next stop in this hop is LYNE! Go see what inspiration she has for you, and be sure to leave a comment before you go to increase your chances of winning a $20 gift certificate!

Thanks for hopping by,
XOXO

December 04, 2013

Pin-spired Christmas


Hi there! I'm popping in today to share a Christmas card I created using a photo from Pinterest for inspiration. There are so many amazing images to peruse that I sometimes get caught up and lose track of time. It's easier just to be given an image and told to create! *smile*


Isn't this one fabulous? I love the colors and textures and angles and just everything!
A few other DT members created cards based on this photo as well, check them out on the Denami blog.


Stamps used: 

Other supplies:

Thanks for stopping by,
XOXO

December 02, 2013

Thanksgiving Recap


I hope all of my online pals who celebrated Thanksgiving had a nice holiday with family and friends.

 Since I was a small child, Thanksgiving has always been my favorite holiday. Getting out the good china, polishing all the heirloom silver, laying out the lace tablecloth and my grandmother's linen napkins, using  mini salt cellars, napkin rings, and placecards, and all the family that would arrive from many states away, just made me so happy. Even though I was relegated to the "kids" table until I was 12, I loved listening to the adults talking and laughing while sitting around my mother's dining room table with all four extra leaves put in to accommodate everyone.

I always host Thanksgiving at my house now and I spend days cooking up a storm!
Not too many family members trek out to the boonies to celebrate at my house, but my mother always comes and usually a few other guests as well. 


Thanksgiving morning always begins with this cake for breakfast. It is a staple and I have been making it on Thanksgiving morning since 1999. Some years I even make it vegan. Simple and delicious.

Thanksgiving Morning Breakfast Cake

1/2 cup butter, softened
1 cup sugar
2 eggs
8 oz. sour cream
1 tsp. almond extract
2 cups flour
1 1/2 tsp. baking powder
1/2 tsp. baking soda
1/2 tsp. salt (1/4 tsp if using salted butter)
1 can of whole berry cranberry sauce (or 1 1/2 cups homemade)

1. Preheat oven to 350°. Grease a bundt pan very well, being sure to get into all the nooks and crannies.
2. Cream butter and sugar until fluffy, then add eggs, sour cream, and almond extract.
3. Combine flour, baking powder, baking soda, and salt, and mix into wet batter until fully incorporated.
4. Dollop half of batter into bundt pan, swirl in half of the cranberry sauce, cover with rest of batter and top off with rest of cranberry sauce, swirling it in. 
5. Bake 1 hour.

Invert cake onto plate, let cool 10 minutes. Drizzle with icing.

Icing

1 cup powdered sugar
1/2 tsp. almond extract
1 T. lemon juice
hot water to make icing 


This is a photo of our table this year. The adults drink wine, but the kids get "kid's wine" which is actually sparkling grape juice:) 


Here's my requisite full plate photo! *chuckle* 
People always ask what on earth vegetarians eat on Thanksgiving...well, here it is!

Mashed potatoes and vegetarian gravy, hickory smoked sliced Tofurky, sweet potato biscuits, green beans with almonds, a yummy dish that my boyfriend contributed (roasted red potatoes, artichoke hearts, and kalamata olives with lemon), traditional celery & onion stuffing, buttered rutabaga, creamed pearled onions, honey/balsamic roasted brussel's sprouts, burgundy mushrooms, and homemade cranberry sauce! 

And just like the adults did when I was small, we sit around the table talking and eating and sharing stories until evening when we dig into dessert:)


I am very thankful for my family and friends, our good health, and all that we have.


If you want to get a head start on your Christmas stamp shopping, check out the ONE DAY sale happening at Denami today. 


Thanks for stopping by,
XOXO

December 01, 2013

Sequined Christmas Banner


Hi there!
Today I am thrilled to be posting a project for Pretty Pink Posh!
Paulina contacted me a while ago to ask if I would participate in a mini blog hop to announce the opening of her sweet little shop carrying all sorts of fabulous embellishments, and I was honored.


You would not believe the goodies inside package she sent me! I squealed in delight when I opened it:) But lets get to the project I created...
Here are the supplies I chose to start with:


I knew I wanted to create a Christmas Banner to hang on my china cabinet in my dining room. I have a banner for all other occasions but nothing for the Christmas holiday. 


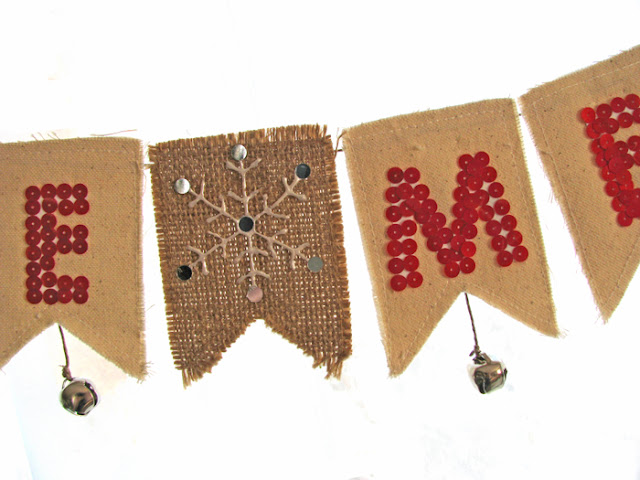
I began by gluing the Raspberry Sequins into letter shapes on the canvas banner pieces to spell out "Be Merry." 


Then I created mini sequin christmas trees on two burlap banner pieces using the Woodlands sequin mix, and the Metallic Bronze sequins for the trunk, and finished them off with a few red sequins from the Classic Christmas mix as decorations. 


Then I created a snowflake for the middle separating banner piece with a pearl pen and added the Silver Confetti to highlight.

I dangled a large Silver Bell from each of the letter banners, and strung them all together with some hemp cord. 


I'm so pleased with this banner and it was easy and simple to make! All those gorgeous sequins glitter so nicely in the right lighting. (It's been a cold, dreary, wintery week here and we have nearly 2 feet of snow and single digit temps so lighting in my dining room is not ideal...)

Now for the Blog Hop details:


There will be a Prize Pack from Pretty Pink Posh for TWO lucky winners drawn from all the comments before December 3rd. Paulina will announce the two winners on Thursday December 5th. 
Plus, as a special you can get free shipping with your order of at least $35 until December 5! Use the special code below!


Thanks for stopping by, and good luck!
XOXO